Mr & Mrs Wedding Card – GDP034

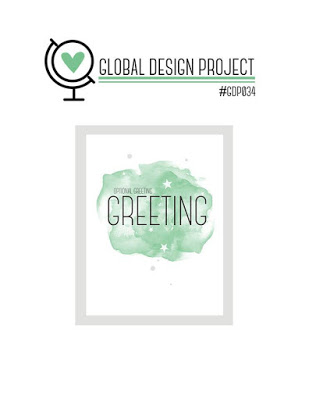
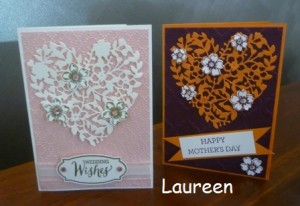
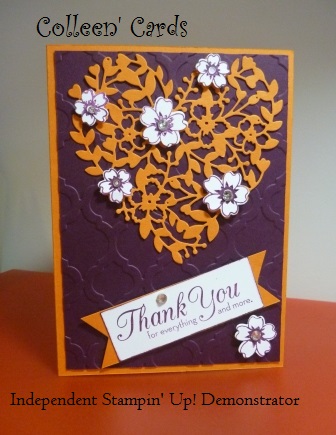
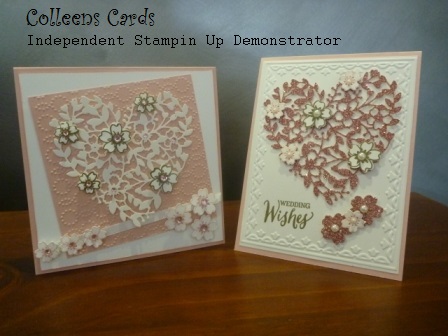
I have been making wedding cards for Friends in the last couple of day, so I decided this weeks   Global Design Project Challenge will be a wedding card. and would you believe I am using White & Gold again.

P1020567

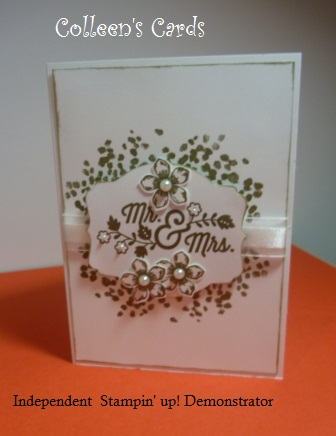
Base and layer is Whisper White Cardstock, then I gold embossed the background using the leaves from the Sheltering Tree stamp set twice on to the Whisper White cardstock layer. then I sponged around the edges with Encore gold ink. then attach a piece of Organza Ribbon to centre  of the stamp piece, then attached it to the base card.

P1020569
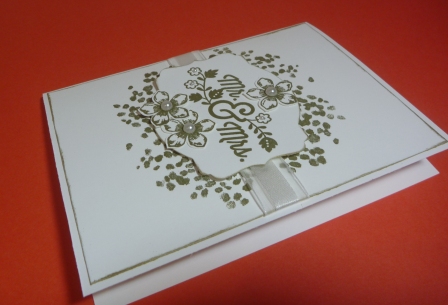
I stamped the Mr & Mrs Greeting from the For the New Two Stamp set ( sad to see this stamp set go) then gold embossed greeting. then I used the second smallest die from the Framelits – Deco Labels (This set will also be retiring) then I attached the piece to the centre of the ribbon using Stampin’ Dimensional.  I decided to add some flowers using the Petite Petals stamp set which I gold embossed then punched out using the Petite Petals punch  I attached the flowers to the top and bottom of the greeting, then I attach Pearl Basic Jewels to the centre of each flower.

GDP034 sketch

World’s Best Mother – GDP033


My card for this weeks Global Design Project Challenge is a card that could be used for a Mother’s Day card or a Birthday Card.

P1020562

Cardstock –  Night of Navy, Sahara Sand, Pretty Petals Designer Series Paper Stack.                        Stamp Set –  A Nice Cuppa.                                                                                                                     Ink Pads –  Calypso CoralVersaMark                                                                                           Accessories:                                                                                                                                                Framelits – Heart Collection  (discontinued)                                                                                           Itty Bitty Accents Punch Pack                                                                                                                    Bow Builder Punch                                                                                                                            Simply Scored Scoring Tool

P1020563

Follow this link World’s Best Mother card for the full instruction.

Global Design Project 033

Beautiful Butterfly – GDP032

I think I should called this card for this weeks Global Design Project Pretty in Pink, as pink is one of my favourite colours.

P1020558

The Base card is Blushing Bride cardstock 13 cm x 13 cm, with the Birthday Bouquet DSP  cut to measure 11.3 cm  x 12 cm as the next layer, I then attach two strips of the Blushing Bride Glimmer Paper to each side of 13.3 cm so that the finish piece measures 12 x 12 cm. adhere to base card.

To the centre of the card attach a piece of Blushing Bride Glimmer Paper that has been punched on each side the Scallop Trim Boarder punch. Die cut the large butterfly from the Butterflies Thinlits using Blushing Bride Cardstock, I used the Clear Wink of Stella Glitter Brush to accent the butterfly, then attach to the front of card using the Dimensionals,

P1020559

Stamp the greeting form the Circle of Spring stamp set using Basic Black ink on to a piece of Blushing Bride cardstock then punch the greeting out using 3.2 cm Scallop Circle punch, attach to bottom of card using Dimensionals. attach Pearls to the butterfly and scallop greeting..

GDP032

.

My Card Class

What a great afternoon at my card class held last Sunday afternoon, everyone enjoyed the afternoon.. Here are some of the cards that my group made.

Wendy's cardTricia card


Pam's cardJudy's card


laureen's cards


If you would like to join me in the next class or would like to hold a workshop just click on the link Card Classes and Workshop at the top of this page.

Sharing in Your Sorrow

P1020545

The Global Design Project this week is sketch challenge,

For this a simple sketch design I was not sure what colours to use after I had decided on the card I would make, so after some thought and trying different colours I decided on Whisper White cardstock for the Base, with Gold Foil Sheets embossed using the Decorative Dots emossing folder. For the next layer die cut a piece of Whisper White cardstock using the Hexagon Hive Thinlits die then attaching it to the Gold Foil emboss piece then adhere to the base card using Stampin’ Dimensionals. adhere a strip of Gold Foil to the top of card.  On a piece of Whisper White cardstock stamp the Frame from the Rose Wonder stamp set and Sharing in your Sorrow greeting from the Thoughts & Prayers stamp set  using the VersaMark ink pad then heat embossed with the Gold Stampin’ Embossing powder. Then die Cut the greeting piece using the frame from the Rose Garden Thinlits Dies, adhere to the gold strip. For the flowers I used the Petite Petals stamp set embossed using VersaMark ink pad and the Gold Stampin’ Embossing powder.the punched out using the Petite Petals Punch.

P1020549

Sketch Challenge


The Open Sea

P1020540

This is my card for this weeks Global Design Project #29 Colour Challenge. I had this design in my head for few weeks for my next card class, but using different colours. So I decided to use the colours from the Colour Challenge. Tangelo Twist, Bermuda Bay, Early Espresso.

Stamped the World Map stamp onto Very Vanilla cardstock using the Early Espresso ink, then die cut it with the Sunburst Thinlits, then die cut a piece of Tangelo Twist cardstock using the Sunburst Thinlits,layed the stamped die cut piece onto the the Tangelo Twist die cut piece off-centring the stamp piece so that part of the Tangelo Twist piece is visible.adhere it to a piece of Bermuda Bay cardstock then trimmed to measure 10.5cm x 13.5cm then attached to the Early Espresso card base.

Stamp the Ship image form the Open Sea stamp set using Early Espresso ink, then die cut the image using the 5th smallest die from the Framelits -Circles Collection. then sponged the image very lightly with Bermuda Bay ink The adhere to a piece of Early Espresso cardstock that had been punched out using the 2½” punch, adhere to front of card using 3D Dimensionals.

Stamp the Congrats stamp from the Party Pants stamp set using the Early Espresso ink on to a piece of Very Vinilla cardstock( this was a Sale-A-Bration product) but any greeting stamp can be used) Punch out the greeting using the Word Window punch or any punch or Thinlit Dies.  Attach to the bottom of card.

GDP029 Colour


Thank You from my Heart

P1020535

The theme for this week Global Design Project Challenge is a Thank You Card                                            A thank you card is a wonderful way of saying thank you to someone who has done something special for you, or just a lovely way of saying thank you to a special person for just being your friend, as we all need Friends to be part of our lives.

The Main colours for this card are Pumpkin Pie cardstock as the base card and Blackberry Bliss cardstock for the top layer which I embossed with the Modern Mosaic Embossing Folder. I then used the Pumpkin Pie cardstock for the heart from the wonderful Bloomin’ Heart Thinlits Dies form the Occasions Catalogue. I love how the two colours work well together.

For the flowers I used Whisper White cardstock and Blackberry Bliss ink (stamped of first onto a bit of scrap paper for a lighter colour before stamping onto the Whisper White Cardstock) The repeated the process for the Thank You greeting from the One Big Meaning stamp set. the white cardstock just adds another element to the card.

GDP027 Thank you


My Granddaughter Birthday Card

For this week’s Global Design Project #26 l Sketch Challenge  I decided to enter the birthday card I made for my Granddaughter Birthday, so making one card for both projects.

Sketch Challenge

And Here is my Granddaughter’s Birthday card

card -3-17JPG

P1020534

I used the Cherry on Top DSP, which worked well with the Watermelon Wonder cardstock. I used the clear Wink of Stella Glitter brush on the Paper Doily. I put two small Rhinestones in the centre of the flowers, not very clear in the photo.


Cards from my Card Class

Minion Flying High Birthday Card

I have posted this card earlier with a promise to post the instruction for the card.

Minion & balloons

Follow this link minion flying high card for the instructions

Follow  this link miion flying high 2 on how to make the Minion.

Below is a link to  Glenda Cairns video on how to assemble the little minion
https://youtu.be/EB68rlwuzIE

Grateful Bunch Card

P1020494


Follow this link greatful bunch card for the instructions


The Sky is the Limit Card

P1020491


Follow this linkThe Sky is the Limit card for the instructions


Happy Father’s Day/Birthday Card

P1020422


Follow this link happy father’s day-birthday card  for the instructions

GDP# 024 CASEing

P1020514

I have made this card using the Mint Macaron and Watermelon Wonder from the 2015-1207 In Colour range, they go so well together. I stamped the flower from the Crazy About You stamp set using Mint Macaron ink. then used the Flower Medallion Punch. I am going to sumit this card to this week             Global Design Project #24 CASEing challenge. This is my first time I have submitted a project.

GDP024